Pages

Tuesday, May 31, 2011

High Hopes Challenge #110

Hello everyone......

It's time for the
High Hopes Challenge!!

This weeks challenge is....
Favorite Pet/ Animal

My absolute favorite HH's stamp is

"Frog in Boxers"

This guy always cracks me up!!!
I love the "Irish Blessing" sentiment that
goes with it too...which I have put on
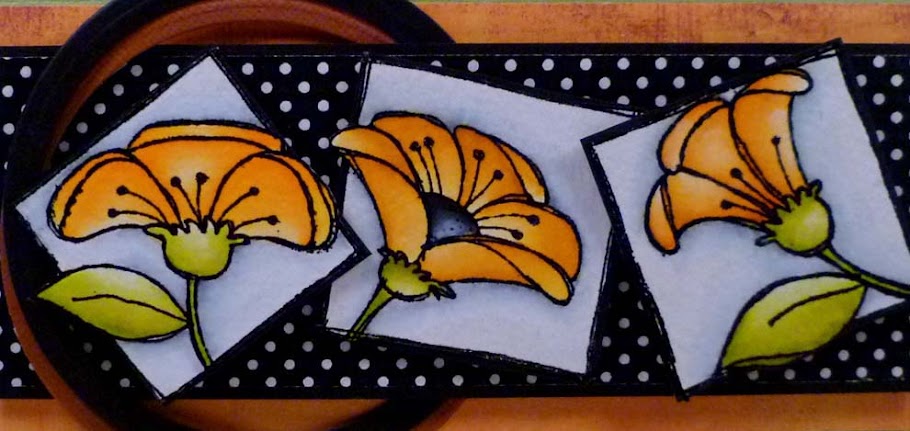
the inside of the card. The flowers are
"Periwinkle Corner"

I embossed the image and sentiments with
black and painted the images with Tombows.
The frame is an embossing folder by Crafts too
on Core' dinations card stock. I sanded the
embossing just a bit. I cut out the center and
added the cloud insert behind the frame.
I used 2 wooden buttons and adhered them to
the frame with my new favorite tabs...
Tombow Power Tabs
These little tabs are amazing for sticking down
embellishments!!
I cut out the frog and kept the clothes line intact
and glued the bakers twine onto the clothes line.
The bakers twine is from the Twinery.
The DP is from Basic Grey.
I embossed the sentiment onto acetate.

Be sure to stop by the
High Hopes Blog
as the Diva's have some fabulous creations
to share with you today!!

I hope you will have time to play along
with us this challenge and
REMEMBER...
you must use High Hopes stamps
to join in our challenges!!!!

Have a wonderful day
and
Thanks so much for stopping by....

KAREN x

Friday, May 27, 2011

Tombow Guest DT

Hello everyone....

Today is my last project as a Guest Design for

TOMBOW USA

I had so much fun...
totally enjoyed my time there!!!

Tire Swinging Dragon

I have always had a fascination with moving cards
creating them whenever I can.
Whether it slides, jiggles, swings, teeters or spins the
reaction from the recipient is the best part of it all!!

The fabulous images are from

High Hopes Stamps

Tire Swing Dragon R-151
Never Tire E-255
Branch M-042

Cut green card stock 6”x 8 ½” and score at 4 ¼”
to form the card. Emboss the whole card with the
CB floral screen embossing folder. Using the large oval
nestability I cut a hole in the center of the card
approx. ¾” from the bottom in the card front.
I cut a large oval from the purple card stock and
before removing it from the die I traced around
the die with a pencil and hand cut the thin frame.
Cut a piece of purple card stock 2 1/8” x 4 1/8”.
Lay it on the card where it is to be placed and
from the inside draw the part oval
and hand cut this piece out.


Clouds

to create the clouds......

I used 2 pieces of plain white card stock cut at
4” x 6” and 3 x 4 ½” I cut out a large scallop
oval nestability for my cloud template. With a sponge
dauber and faded jeans distress ink I lightly
sponged around the scallops moving the template
to different angles to form the clouds. I went back
in with the template just slightly off the blue
and sponge some dusty concord distress
ink to create a shadow.

I trimmed the smaller finished cloud piece down
to 2” x 4” and adhered it to the preciously cut
purple piece of cardstock with Tombow Mono
aqua liquid glue. I trimmed it to the oval of the
purple piece. Using Tombow foam tabs I adhered
it to the top of the card leaving even spacing on
top and sides above the oval.

With the 4’ x 6” finished cloud piece I moved it
around the oval from the inside of the card to get
the best look, marked the edges and trimmed it
to fit inside the front of the card. I adhered it with
Tombow mono aqua liquid glue. I adhered the
thin purple oval frame to the oval cut out on the
front of the card with a very thin line of Tombow
mono aqua liquid glue from the fine tip.

I stamped and embossed the images with black
EP and painted them with Tombow markers,
paintbrush and water and cut them out. I cut
a length of bakers twine approx. 7” long. Starting at
the tire I adhered the twine to the rope on the
image with a very fine line of the liquid glue making
sure I have enough twine to wrap around the tire
and back behind the dragon and enough to wrap
around the branch at the top also. Glue the twine all
the way up the rope on the image. Wrap
the top of the twine around the branch
judging the dragon in the center of the oval and
tie around the branch. I used the Tombow small
foam tabs for the back of the branch and when
I had the right positioning of the dragon I adhered
the branch to the clouds. Fold the twine around
the tire and adhere it to the back
of the dragon with tape.

The dragon will now swing from the branch!!!!

I have added the color chart for the
dragon and here is a list of the Tombow
markers I used.

Tombow markers

N65-N75-N25 ….Tire
942-947-977….Branch
076-098….Leaves and dragon body
942-933-946….Body and face
623-636 Purple

Have a wonderful day
and
Thanks so much for stopping by....

KAREN x

Thursday, May 26, 2011

Tombow Guest DT

Hello everyone.....

Today for my GDT over at

TOMBOW USA

I created a Parchment Butterfly card

Parchment craft….also known as Pergamano
is the art of embellishing parchment paper
through the techniques such as embossing,
perforating, stippling, cutting and coloring.

To start I took a piece of parchment paper and
placed it onto a pattern. I used painters tape to
tape it to the pattern. With a mapping pen and
Tinta ink I traced the pattern onto the parchment
paper. I used sections of two different patterns and
some of my own patterns for this card. Once the
pattern is complete I placed the paper with the
good side face up onto a piercing grid. With the
arrow tool I pieced the holes in the center of
the card. I removed the paper from the grid
and with the good side face down I placed it
onto an embossing pad and with my embossing
tools I embossed sections of the pattern.

When you emboss the parchment paper it is

actually stretching the parchment and it turns
the paper white. You can now see the sections
that have been embossed. To cut the sections
out of the parchment paper around the outside
edges of the card I perforated all the sections
I wanted to remove with a 2 split tool and
removed the excess parchment paper.
This is a very delicate process as now that
the parchment is embossed it becomes very fragile.

I traced the butterfly twice on plain parchment
and once on blue parchment. The front butterfly
is the only layer of the 3 that has the detail
and is embossed and cut out.

The card itself is made with blue parchment
paper. I traced the outside of the card

with the Tinta ink and then perforated

the edge with the 2 split tool to remove the

excess parchment paper.

To put the card together I used Tombow Power
tabs. I cut 2 tabs into quarters and placed

one quarter of a tab behind the embossed

section of each design and centered it onto

the blue parchment card. I adhered all 3 layers

of the butterfly using Tombow mono aqua

liquid glue along the body sections.

The butterfly is adhered to the card with

Tombow power tabs. The flat back pearls

are glued with Tombow mono aqua liquid glue

and the bow is attached to the card

with the power tabs.

Before I was introduced to Tombow adhesive
products I had to adhere my parchment
cards with
silicone from a tube.
It took a while for the silicone
to set up
and using regular glue would crinkle the
parchment. I was totally amazed when I used

the liquid glue and the power tabs
on my project.
Now my cards go together so quickly with
no gooey mess....I love it!!!

The tools I used.

Have a great day
and
Thanks so much for stopping by.....

KAREN x

Wednesday, May 25, 2011

Tombow Guest DT

Good morning everyone....

For my second project for

TOMBOW USA
I have created an
Easel Card Note Card
and Tag Set


The easel card is one of may favorite folds
It is so versatile....I have used it for cards,
photo album cards and gift box card combos


The box measures 4.75" x 4.75". I have changed
the dimensions from a box by Holly McMillen @SCS

To start I made the box. I wanted it to be strong
so I made it from cream CS and then covered
it with DP. The easel card base is 4.5" x 8".
On the long side score at 2" and 4". The card back
is 4.5" x 4.5". I adhered the card back to the card
base on the 2" fold with Tombow Permanent
adhesive stamp runner. All the DP is adhered with
Tombow Mono Aqua Liquid glue using the brush end.
The tag holder measures 3 3/8" x 2 7/8".
I used my Inkssentials white gel pen to add the dots.
I adhered the tag holder box to the card
with Tombow Mono Adhesive Power Bond
tape runner.

I cut 2 slits into the finished oval pen holder
(which is also the stopper to hole the easel up)
adding a decorated 1/2" strip of cardstock
through the holes and folding the ends onto the
backside of the oval. I put the pen into the strip and
pulled the ends so that it was a perfect fit for the pen.
I then adhered it with Tombow Power Bond tape
runner adding a Tombow foam tab over these
ends for extra security. The scallop oval pen
holder, butterfly and flower are adhered with
Tombow foam tabs. I used Tombow Mono
adhesive liquid glue to adhere the easel card
to the box.

All the fabulous images are from
High Hopes Stamps

Ruffle Posey Button H-250
Daisy Button H-248
DH Double Daisy- J108
Round Posey Button- H249
Valentine Butterfly front- G296
Valentine Butterfly side-G297
Paisley Butterfly- H242

Note cards:

The note cards are 4.25" x 4.25".
I used a CB folder to emboss each card and the
first layer of the Nesties oval frame
The layers and flowers are adhered with Tombow
Foam Tabs and the bows are adhered with
Tombow Power tabs.

Tags:
The tags measure 4.75" x 2.5"
I used Tombow Mono adhesive power
bond tape runner to adhere the ribbon to the tag
front center and the adhered the finished ovals
over the ribbon onto the front of the tag
with Tombow Foam Tabs.


The great thing about the easel card is
that it folds flat. The pen stops it from folding
perfectly flat but makes it easy to wrap
or store.


*Just a note to tell you about the adorable pen.
It is really a full size pen but the burgandy part
slides up the silver part of the pen so you can
shorten it...telescopic. Perfect for a project like this.
I found it at our local Staple Business depot
here in Canada!!

Have a fabulous day
and
Thanks so much for stopping by....

KAREN x

Tuesday, May 24, 2011

Tombow Guest DT

Hello everyone.....

I am doing a GDT spot this week with my
all time favorite marker company....

TOMBOW USA

You all know how I love Tombow markers!
I have been using their adhesives too
and let me tell you...
I am totally impressed!!!

The first project I have created is a
wooden frame...


All the images I have used are from
High Hopes stamps


Sailor Andy T-120
Summer Sail Boat H-252
Anchor F-144

Summer sunshine H-251

I painted the wooden frame with white acrylic paint.
The first smaller frame is made with adhesive
backed cork. I punched the pieces of cork with
my EK Success border punch and cut 45 degree
angles for the corners. I used Tombow Mono Aqua
liquid glue to adhere the cord to the frame.
I laid out the cord to the design I wanted and
small strips of painters tape to hold it in place.
I lifted small sections (about 2" at a time)
of the cord placing glue underneath from the
fine tip end. I added the tape pieces back after
it was glued which I found out was unnecessary
because the glue held the cord in place perfectly!!
I cut another smaller frame from
thin cardboard, rounded the corners and
covered it with blue fabric CS suing Tombow
Permanent adhesive stamp runner. To adhere
this frame I used Tombow Mno adhesive
Power bond tape runner. The buttons were
attached with Tombow Power Tabs. I cut 1
square into quarters and used 1 quarter
for each button. Since I have been using
these power tabs I have retired my
glue gun!!!
All the images have been colored with
Tombow markers a paint brush and
water. The images are adhered to the frame
with Tombow foam tabs. The flat backed pearls
were adhered with Tombow Mono Aqua
liquid glue.

It's tutorial week over at the
High Hopes Blog
so be sure to check
out Kristine's fabulous

Zig Zag Card Tutorial!!!

Have a fabulous day
and
Thanks so much for stopping by.....

KAREN x

Tuesday, May 17, 2011

High Hopes Challenge #109

HELLO EVERYONE.....

It's time for the High Hopes Challenge
This weeks challenge is
...3D...
Alter or create a 3D Box or Bag

My first project is an altered tea box using the
adorable "Teddy for Tea" image
and " Me N' You" sentiment


I covered a box of Lipton tea with DP
I embossed the image with black and
painted it with Tombows. I used my Nesties
ovals for the frames. I made the rose for the
top of the box with my small pear punch for
the petals and my MS frond punch for the leaves
and MS fern punch.

***********************

My next 3D project is a tea bag holder.
I am using an older High Hopes image
from their original catalogue...

"Aunt Shirley's Tea"
and
"Tea Tag"

To create the card tea bag holder I used
the directions by Beate Johns @ SCS

I added an extra folder inside for mine as
well as making the card larger.
I embossed the images with black
and painted the cup and tag with
Heavenly...H2o's. The flowers and
leaves are painted with Tombows and I used
a Gelly Roll Metallic pen for the gold trim.
The border is done with a MS punch and
I added some flat backed pearls.

The tea bag in the cup is a Lipton individual
tea bag in a net bag and
the bags inside the holders are individually
wrapped in packages.


Be sure to stop by the High Hopes Blog
as the Diva's have created some
amazing 3D projects to share with you!!!

I hope you will have time to play along with
us this challenge and
Remember.....
You must use a High Hopes image to
play along!!

Have a wonderful day
and
Thanks so much for stopping by....

KAREN x

Tuesday, May 10, 2011

High Hopes Tutorial Week


GOOD MORNING EVERYONE.....

It's Tutorial Week over at the
High Hopes Blog

This week our lovely Lacey is
showing you a fabulous tutorial on
how she makes her....

"MINI TREAT BAG"

It's a great little bag....I can think
of so many uses for it!!!

Be sure to stop by the
High Hopes Blog and check
it out!!!

It's been a while since I made a
stair step card and with all the
awesome new stamps I thought it
was time to whip up another one.

I decided to go with the
"ROBOTS"
Such a fun collection of techno guys...
by artist
"Laurie Furnell"

The stamps I used are...
Robo Dog
Gears Border
Robot w/ Balloon
Jumping Party Robot
Robot w/ Cupcake
and the sentiments
Gears to You
Transmitting Birthday Wishes

I embossed the images with black
and painted them with Tombows.
I cut them all out and layered them.
I used some fine metal mesh and
stapled it to the card.
I used a CB embossing folder for
the black backgrounds and sponged
the embossing with Versa grey ink.
I also added some stickles.

The High Hopes Challenge will run until
next Monday...so you still have
time to enter.

Have a wonderful day
and
Thanks so much for stopping by....

KAREN x

Tuesday, May 3, 2011

High Hopes Challenge #108

GOOD MORNING EVERYONE......

It's time for the High Hopes Challenge!!!

This weeks challenge is brought to you by ME!!

"ANYTHING GOES"


The fabulous image I am using is
"Firefighter Dragon"
and
"Go Ahead"
sentiment by artist Dustin Pike
I created the background
with HH's brick stamp and
used the flame stamp for embellishments


I embossed the image with black and
painted them with Tombows. I stamped
the bricks with Perfect Medium and embossed
them with white. I used Pumice stone
Distress Ink to color them.
I cut the frames out with my nesties.
I colored and cut out the extra flames
I added some netting and
flatbacked pearls

Be sure to stop by the High Hopes Blog
as the Diva's have some awesome
creations to share with you today!!!

I hope you will have time to play along
with us this challenge and
REMEMBER...
you must us a High Hopes image
to qualify for the prize!!!

Have a fantastic day
and Thanks so much for stopping by.....

KAREN x